
“There is no sincerer love than the love of food.”
– George Bernard Shaw
In The Kitchen
Meals for Two for $10.00 or Less
Recipes for Couples and Singles on a Budget
I am a firm believer that anyone should be able to stay home and make a delicious meal in their own kitchen for under $10.00. I challenge you to give it a try… buon appetito!
Breakfast
Strawberry Pancakes
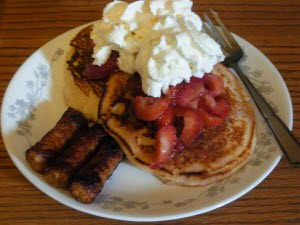
Where can you go to get breakfast for under a $1.00? That’s right! Less than $1.00 actually. Strawberry Pancakes is so easy to make. The trick is let the batter rise for about an hour, otherwise they will feel like boat anchors.
Take your favorite pancake mix, Bisquick works, but because we live in Northern California, we chose Krusteaz. Follow the directions to make the batter. Let the mix rise in the bowl for about an hour.
Prepare the strawberries by washing then slicing them. Add sugar to taste to allow the juice to happen.
About 5-7 minutes before starting the pancakes, prepare the sausage links according to the directions. When finished, place on a plate covered in paper towel to absorb the grease. Place in a warm oven to keep hot.
Cook the pancakes according to the directions. Place on a plate, top with the strawberries and add whip cream. Add the sausage links and you’ve just prepared a scrumptious breakfast for less than $1.00.
Lunch and Dinner
Homemade Lasagna
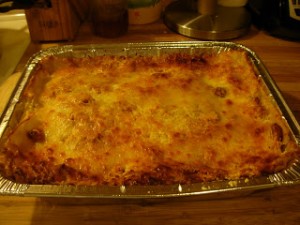
Making homemade lasagna can be intimidating for some. Actually, it is quite easy. Even I can go it and I don’t cook! First let’s decide on what type of lasagna you want to make – vegetarian, meat, or whatever you might prefer. The size of the pan is the next decision you need to make. If you use the standard disposable aluminum lasagna pan you can purchase from the grocery store, your cleanup will be simple.
Purchase the ingredients you’ll need: one to two packages of lasagna noodles (depending on the pan size), 2 cans of diced tomatos (16 ounce size), 2 cans of tomato sauce (small cans), bulk or italian sausage (if you want meat in your lasagna), basil, oregano, fennel seed, one medium onion (diced into 1/4 inch cubes), one medium green pepper (diced into 1/5 inch cubes), 5-6 large mushrooms (button or crimini), parmesan, romano, asiago and mozzella cheese, and ricotta cheese. Salt and sugar.
Blend the parmesan, romano, and asiago cheeses. Set aside.
Make the lasagna noodles according to the package. Set aside.
In a medium saucepan over medium heat, mix together the diced tomatos, tomato sauce. Add a teaspoon of basil and a teaspoon of oregano. Take a half teaspoon of fennel seed and crack them with a mortar and pestal. Add to sauce mixture. Add onion, green pepper, and mushrooms. Add salt and sugar to taste. Simmer on medium heat until all ingredients are blended and warmed through.
If you want meat, cook bulk or italian sausage removed from the skin in a frying pan until brown and cooked through. Make sure the sausage is in small chunks no larger than 1/2 inch in size.When finished cooking put meat on a plate layered with paper towel to drain the grease off the meat. Add the meat to the sauce.
Now take your pan and coat it with olive oil and then let the layering begin. Make a layer of noodles, then make a layer of sauce, then another layer of noodles. Now make a layer of ricotta. Then make a layer of noodles, then make a layer of sauce, another layer of cheese, another layer of noodles, then another layer of cheese.
Cover the pan with aluminum foil. Poke holes in the foil. Place in the oven and bake at 375 degrees for an hour. Remove foil and let cheese brown (it may take 15 minutes to a half hour). Remove from the oven and let everything cool for about 10 minutes. Cut and serve with your favorite crusty bread.
Salmon with White Rice and Asparagus
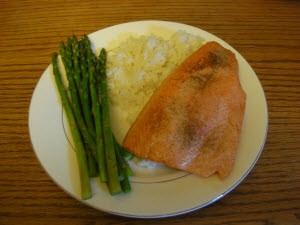
| Salmon with White Rice and Asparagus |
This is a simple, classic meal and it can be made using your favorite fish. We used salmon that we purchased in bulk from our local Costco.
Start the rice first as it takes 20-30 minutes for the rice to cook. Take 2 cups of water and 1 cup of white rice, teaspoon of salt, tablespoon of butter and turn the heat on until the liquid in the pot starts to bowl. Turn down until just boiling and cook until most of the liquid is gone. Stirring occasionally so the rice doesn’t stick.
Cut off the woody steam of the asparagus and peal the bottom half if it is late season. If it is early season, just cut the ends off. Put asparagus on a platter that is longer than the asparagus and cover with plastic wrap. Cut small slits in the plastic wrap and place asparagus in the microwave. Heat the asparagus for one minute at 3/4 of the way cooking time for the fish.
The fish will take 15 minutes to cook. Put some olive oil in a pan heated to medium-high (the oil needs to be under the smoking point about 380 degrees), add garlic (smashed). Put salt and pepper on the salmon and place in the pan skin side down. Cook the salmon until done (the flesh needs to be firm and not overcooked and dried out). If you want it more cooked, and the end you can put the lid on the pan for 3-4 minutes and it will steam the fish from the top down so it is more cooked and not dried out.
When the fish is almost done, heat the asparagus on high for another minute. For softer asparagus, heat for an additional third minute. Otherwise, add a little salt and butter when serving.
Cost: Rice when purchased in bulk on average is $.10 to $.20 per serving. Asparagus is $.75 per serving. The fish we purchased was $15.00 which we cut in half and we each had 1/2 of the half. So the cost per serving is $3.75. Total cost is $4.60 – $4.70 per serving.
This is an amazing meal and you won’t go hungry…I can guarantee it. We had it with a nice bottle of dry white wine (which didn’t cost us a thing because I got the bottle for free).
Homemade Pizza
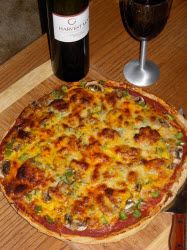
Mmmm…mmmm…mmmm! There is nothing better than homemade pizza. Not frozen, not take-n-bake, not take-and-eat, nor restaurant version can match the wonderful gooey, cheesy, deliciousness.
The best part…it’s totally unpredictable. Why do I say that you might ask? It’s unpredictable because this fabulous food can be made from a multitude of ingredients used in numerous combinations. No two pizzas would be alike if you wanted it to be.
Pizza is all about the crust, sauce and the toppings!
Crust
Make the crust using whatever method you choose. Some of you would prefer to use a standard mix, while others would prefer to make it from scratch using your grandmothers recipe. This takes about 15 minutes to make (plus rising time) and costs about 50 cents. Still others may just want to make it simple and use a pre-package crust like Boboli. Use whichever one you prefer and find the easiest. If you have the time, try making it from scratch. There are lots of recipes available online to choose from. Be sure to make it and pre-bake it for about 10 minutes at 450 degrees.
Sauce
One of the things that we noticed about pizzas, other than the ones that we make, is the lack of good or enough sauce. We either make the sauce ourselves from garden fresh tomatoes (in-season) or by using plenty of tomato paste. You don’t want the sauce to be too runny because then all the toppings just slide off the slice. Be sure to add the appropriate spices to taste. Some popular ones include fennel, basil, and oregano. If you want to experiment, try using pesto or some other type of sauce you’d want to see on a pizza.
Toppings
Living in California has afforded us to make our pizzas with the most freshest ingredients. Use a variety of fresh local ingredients from the neighborhood farmer’s market, vegetable stand or the local grocer. Be sure to select the freshest mushrooms, peppers (all colors), onions, black olives or any other topping that suits your taste. We’ve noticed that many Californians like to experiment with their pizza so they will select artichoke hearts, roasted eggplant, zucchini and even sweet corn. Choose the ingredients that you love and don’t be afraid to experiment. If you want pineapple on your pizza, then go for it!
There are a variety of meats and seafoods that you can choose from, including ham, chicken, pepperoni, proscuitto, sausage, venison, salmon, lobster, tuna and prawns. Choose from any of those or not at all. There’s nothing wrong with the occasional veggie pizza!
Select the cheese that works for you…try fresh mozzarella, cheddar, colby, parmigiano – reggiano, or something even more exotic like feta, goat cheese, gorgonzola, or roquefort.
Remember, the type of pizza you decide to make will dictate the types of ingredients you choose to put on it. For me, the perfect pizza is just plain and simple. I like cheese and sausage, so it’s just fresh mozzarella or maybe cheddar and sausage from my favorite vendor.
Once you’ve selected your ingredients, and placed them on top of your pre-baked crust or pre-packaged crust, then place in the oven at 350 degrees for 10-20 minutes until the cheese is golden brown. Be sure to watch it so as not to burn the crust or the cheese.
You can make a large pizza (16″-18″) for under $10.00 (depending on the ingredient selection) and enjoy it for several meals. Very economical and delicious.
Pasta in A Bowl
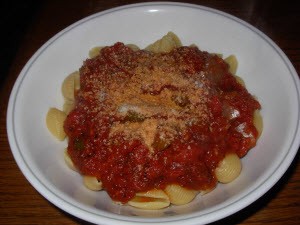
|
Pasta In A Bowl |
I love pasta. All kinds. I guess you could say I am a “Carb Queen”! Regardless, there is nothing better than simple comfort food that comes in a bowl. Pasta In A Bowl is a very easy, quick and inexpensive meal to make.
The trick with this is to start the sauce first. However, you do want to start a pan of water to boil. Prepare the water according to the package of pasta and heat it slowly. It should take about 10-15 minutes to get the water boiling. I know you’re wondering why I am asking you to take so long to get the water boiling. It’s all about timing, so trust me. At this point, don’t put the pasta in the water.
Empty your favorite pasta sauce (I tend to like the Classico brand, but you can use whatever you prefer) into a saucepan. Bring the temperature to medium heat. When we’re in the mood, we might make the sauce from scratch, but it’s off season and not worth the effort tonight. Remember that your sauce should taste the way you want it. We always add extra ingredients such as fennel, basil, oregano, salt, bay leaf and sugar to taste. If you need to add some vegies, choose onion, green peppers, and black olives.
Mix all the ingredients together in the saucepan and simmer the sauce on medium heat for about 20-30 minutes Remember you don’t want to cook the sauce on really high heat because you’ll burn it. I will start out a little above medium heat and then turn it down as I don’t really want it to boil. Use a splatter screen while the sauce is heating to minimize the sauce from spraying out of the pan.
About halfway thru the heating process of the sauce, the water should be boiling. Simply take whatever pasta you might have on had, above I used shells. Place the pasta in the water and make as directed. When the pasta is finished, remove the pan from the heat and drain into a pasta strainer. Don’t rinse. The sauce should be ready now so turn off the heat. Be sure to remove the bay leaf if you’ve used one as it’s toxic if you ingest it.
Place your pasta in a bowl and pour the sauce over it. Add parmigiano reggiano or other cheese you prefer. Serve with a baguette and your favorite glass of wine!
This whole meal costs less than $5.00 for two depending on the extra ingredients you add and if you choose to serve it with a baguette. (I didn’t count the cost of the wine, because this page is all about the food!)
Valentine’s Day Dinner
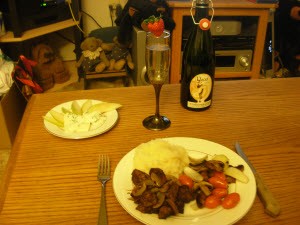
Just finished an amazing dinner prepared for me by my husband. He is a fabulous cook and I love it when he makes meals for me. So what did he make?
Anjou Pears with Gorgonzola Cheese
Tenderloin Tidbits with Mushrooms, Onions & Tomatoes and Mashed Potatoes
A fabulous bottle of Toad Hollow Vineyard’s Risque Sparkling Wine
1/2 hour prep and cook. Restaurant Cost = $75/plate; Cook at home cost = less than $10.00 for two. More details to follow.
Snacks and Desserts
Homemade Pumpkin Pie
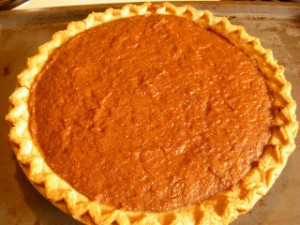
| ©Susan Dusterhoft 2011 |
If you would like a pumpkin pie with texture instead of a pureed can, then here is what you do. Get a pumpkin. Depending on how many pies you want will determine the size. You can use a sugar pumpkin or a regular pumpkin, which can be had at a bargain slightly before Halloween.
Cut the pumpkin in half and remove the seeds and pulp. Cut the halves in half and place in a cake pan. Add water to the pan and cover with aluminum foil. Bake at 350 degrees for 1 1/2 to 2 hours until a fork can be inserted all the way thru the pumpkin.
Remove the pumpkin and let it cool. Scrap the meat out into a bowl and mash with a potato masher. Place 2-3 cups in a flour sack towel and squeeze out as much water as you can. Set the water aside for to use in your pumpkin bread if you want. Your pumpkin is now ready to be made into a pie.
For one 9 inch deep dish put 20 ounces of pumpkin by weight in a mixing bowl. Add half a cup of white granulated sugar, half a cup brown sugar, firmly packed, one 12 oz can evaporated milk, 2 eggs and combine until thoroughly mixed. Add:
A teaspoon of vanilla
2 tablespoons of cinnamon
1 teaspoon of ginger
1 teaspoon of nutmeg
½ teaspoon of cloves
½ teaspoon of salt
Mix all until consistently incorporated.
Preheat oven to 400 degrees.
Fill one 9 inch deep dish pie shell and distribute evenly. Your mixture should be fairly thick and will need to be spread out with a spatula or the back of a large spoon. Bake for 15 minutes at 400 degrees, then reduce the oven temperature to 350 degrees and bake for an additional 45 minutes or until a toothpick inserted in the middle comes out clean.
Remove the pie from the oven and let cool. Serve with real whipping cream.
Whipping Cream:
Assuming you have an electric mixer with a whisk attachment, refrigerate the mixing bowl and whipping cream to a temperature of 40 degrees. When ready, remove the bowl and whipping cream from the refrigerator, add the whipping cream to the bowl and begin mixing at medium-high speed. Add one teaspoon of vanilla. Add up to ½ cup of sugar depending how sweet you like your whipped cream. Whip the cream until you get peaks that retain their shape. Serve immediately.
This is a fairly spicy pie. You may modify to taste.
Here it is…something with chocolate in it! Enjoy!
Brownies with Raspberries and Vanilla Ice Cream
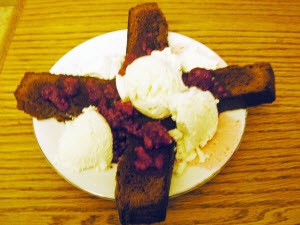
| Brownies with Raspberries and Vanilla Ice Cream |
What a yummy dessert that’s fast and simple. All you need is one package brownie mix, some fresh or frozen raspberries (approximately 1/2 pint) and a little vanilla bean ice cream.
Prepare and bake the brownies according to the package. When done baking let cool on a cooling rack.
Put the berries in a bowl and add a tablespoon of sugar. Set at room temperature until juice comes up. Then stir and refrigerate until serving time.
Slice the brownies in 1/2 inch thick slices. Add a few scoops of ice cream. Pour the berries and juice over the top. Be sure to serve the brownies slightly warm.
I love dessert. All kinds…especially if it has chocolate in it. But when the fresh fruit is in season, I love dessert with fruit in it. And the most classic dessert I can come up with that has fruit is one of my favorites….
Strawberry Shortcake
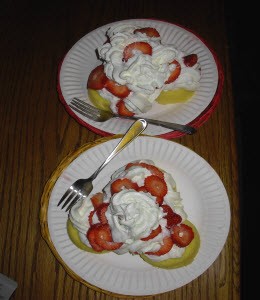
Take the most freshest strawberries and wash them thoroughly. Then thinly slice them using a sharp paring knife. Place the the slices into a bowl and sprinkle some sugar over them to develop the juice. Let sit for about an hour.
For the cake part, use dessert cups, pound cake or angel food cake. Place the cake/cup on a plate or in a bowl. Spread real whip cream over the cups, and then add a layer of strawberries. Pour some of the juice over the top. Add more whip cream and then garnish with strawberry slices as desired.
How To’s
Homemade Grape Jam (from real grapes grown in our garden)
| “My Garden Grapes” by Edward Dusterhoft |
Don’t these look yummy! We have about 4 grapevines in our small, back patio area. One is just a rootstock, and then there are three others. We planted them years ago when we first moved into our condo, but today, if you asked me what type they are, I wouldn’t be able tell you. I just know they look beautiful and taste great.
Originally we planted these grapes to hide the ugly garage wall that our patio backs into. Now since they are finally established they are actually producing these beauties. Not producing alot mind you, but enough to make a very small batch of jam. Even the rootstock had grapes on it! There isn’t anything grafted onto it so somehow being in close proximity it cultivated it’s own variety! How cool is that!
So you are probably wondering how we made the jam. Well, it was easy. Be sure to destem the grapes first. Then, using a similar recipe similary used for making cranberries, put the grapes into a pot and heat them until the juice starts to form. Then mashed them with a potato masher to get out as much juice as possible.
Once everything is completely mashed, put the grapes through a fine sieve to separate the juice from the skins and seeds. Put the resulting juice back on the heat, and bring to a high boil. Add sugar to the desired sweetness.
I like tart so we didn’t put in very much sugar. With about two cups of juice, we added added 1/2 cup of sugar and then tasted. Always remember to taste before adding more sugar. You can always add, but you can’t take away. Remember these are flavorable wine grapes. If you use concord grapes or any other kind of table grapes you will need to add a different amount of sugar.
Bring the liquid/sugar mixture to a high boil for 10-20 minutes. Remember, you need to boil it at a high enough temperature to get it to jell; which means it needs to boil above the boiling point of water (212 degrees). You want it to be 225 to 230 degrees so the natural pectin allows the juice to jell.
Pour it into whatever vessal you choose and let cool. If you want to make preserves, follow the standard procedures for canning. Since we didn’t have that many grapes we didn’t feel the need to go this route. We just had enough for a small bowl.
My husband thinks this is really just a fruit compote and the truth is that you can use any fruit that is in season. If the fruit is naturally sweet, you don’t need to add a lot of extra sugar. As for me, this is probably the best grape jam, I’ve ever tasted.
Cost: Essentially FREE as the grapes were already ours!
| Homemade Grape Jam |
Thick-Cut Sirloin Steaks for $2.89/lb
Most of us like to have a good steak every now and then. What we don’t necessarily want to do is to go out to dinner and pay the $50.00+ tab. Depending on the restaurant, that bill could be double or even triple. In this economy, most of us can’t afford it. However, we can afford to eat a really good, thick-cut, sirloin steak for $2.89/lb.
When shopping for meat, you should be looking at the price per pound, not the overall price. You should also look at how many meals you can get out of the cut of meat. For example, filet mignon at the local grocery store is 15.00 per pound, at the local specialty store it is $22.00 per pound, and at the wholesale store it’s 9.00 per pound. If the meat purchased at the grocery store and the specialty store is only one serving, then that is almost as expensive as going out to dinner. However, if you purchase a larger piece of the filet mignon, you might actually spend as much as an expensive dinner out, but you actually get more servings.
Above, you’ll see a recent purchase we made of a very nice cut of Beef Round Tip. The cost was $2.89/lb and the total weight was 9.06 pounds. You’ll see the total cost was $25.82. For most people, this is alot of money for a piece of meat, but for us, this cut of meat will provide us 18 servings. Yes, that’s right! 18 individual servings!
Here’s how we did it:
Remove the meat from its package, rinse if off and put it on a large cutting board:
Depending on the piece you have, remove the excess fat, tendons and membrane.
Slice the meat to your desired thickness:
We were able to slice 4 thick-cut sirloins from this piece of meat ( 2 – 2lb steaks, 2 – 1 3/4lb steaks).
We still had some left over bits, so we cut them up into smaller pieces:
Then we turned to our KitchenAid Mixer (best kitchen investment we ever made) and added the meat grinder attachment:
Turn on the mixer and feed the meat into the top of the grinder:
From the left over pieces, we were able to make 1 1/2 pounds of sirloin burger meat:
Overall, there was about 4-6 ounces of waste and we ended up with all this meat for 18 meals. What did we spend again…$25.82. This ends up being $1.43 per serving. Now…what restaurant did you want to go to again? I think I’ll stay home and have my husband make me dinner.